


The wildly popular Minecraft texture packs let players give the game their unique sense of style and design.
Players can choose to create their unique texture packs and customize even the smallest details, even though there are thousands of fantastic texture packs that are freely available to download on the internet.
Making a texture pack for Minecraft is fairly simple and only needs a few simple tools. This tutorial will cover all the information players require to make their custom Minecraft texture pack in the simplest manner possible.
Let’s get to it without further ado!
STEP 1: Open .minecraft folder
The Minecraft directory must be opened to create a texture pack in the game. Open the start menu on Windows and enter %appdata%. Then press Enter to launch the .minecraft folder.
STEP 2: Extract texture packs files
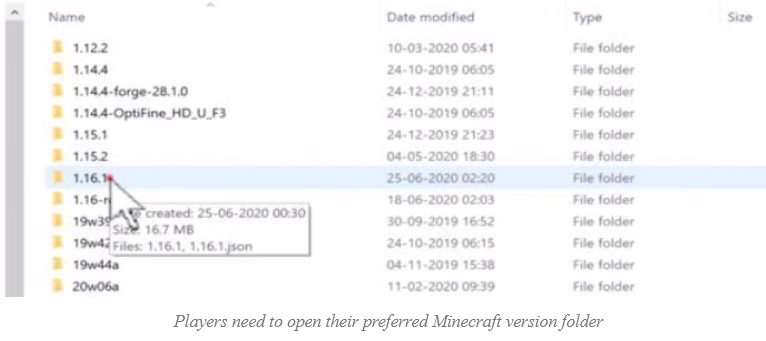
Before opening the “versions” folder, open the .minecraft directory next. You should now access a folder inside this one that bears the name of the Minecraft edition they wish to edit the texture pack for.
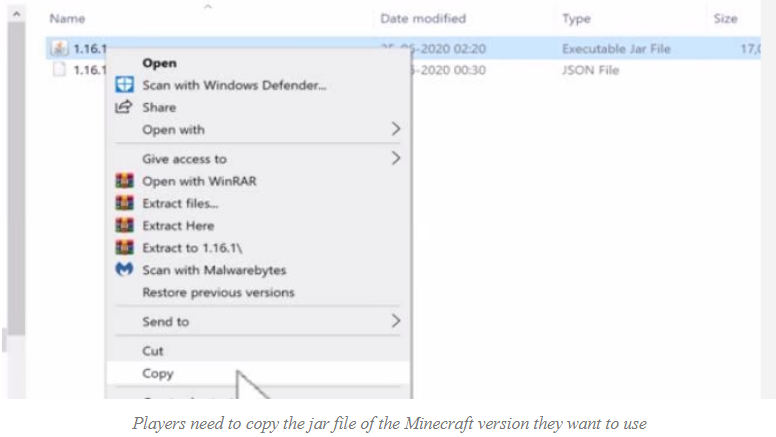
Players should locate a jar file inside of this folder and right-click it before selecting “copy.” Now, users must make a brand-new folder in the root. minecraft directory. You can give this new folder any name you want. The copied jar file should then be pasted inside this folder. Players must then right-click the recently pasted jar file and select “extract to” from the menu that appears.
STEP 3: Open texture packs older
Players must go to the textures folder after everything has been extracted. To do this, select Assets > Minecraft > Textures. Players can choose specific textures they want to edit from this textures folder.
STEP 4: Edit textures packs
Now, players can edit any texture they want by simply right-clicking the image file and using any image editing program to open it. For the most part, though, Microsoft Paint will work just fine. Players must make sure to save the updated changes made after finishing editing the texture as desired.
STEP 5: Create pack .mcmeta file:
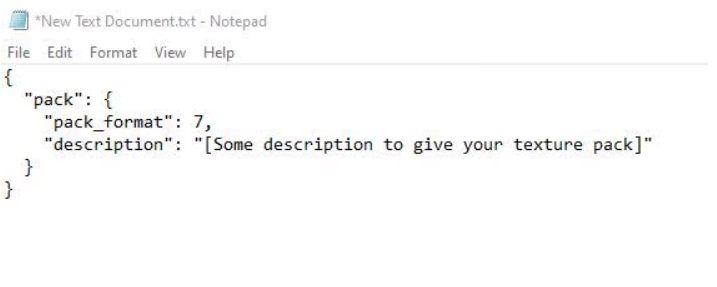
Reopen the folder containing the base directory of the content that was recently unzipped (the folder with the version number only). Here, a new file needs to be created. To do this, right-click inside the directory and select New > Text Document. The new text document must contain the following text:
{
“pack”: {
“pack-format”: 7,
“description” : “[Give a description to your texture pack]”
}
}
For version 1.17, the pack format number should remain at 7, 6 for version 1.16, 5 for version 1.15, and so on.
STEP 6: Save pack .mcmeta file:
Now, this file needs to be saved in Windows with the exact name “pack. mcmeta” and the “All files” file type.
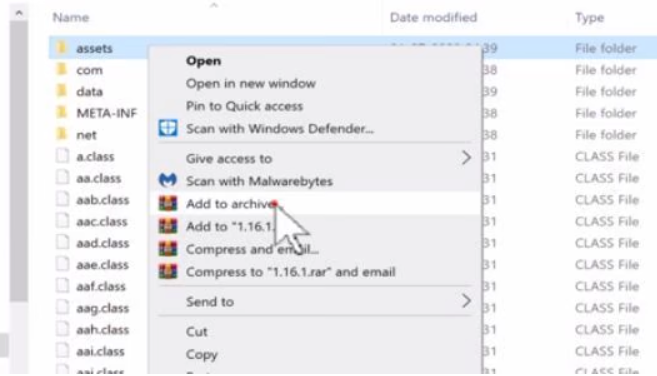
The pack. mcmeta file must be successfully saved inside before the finished product can be assembled. You can accomplish this by clicking the “assets” folder while holding down the “Ctrl” key, followed by clicking the mcmeta file. Players must then use their zipping tool to right-click either file and select “add to archive” (7 zip or WinZip for example).
That’s it! You have just finished making your texture pack. Follow this guide carefully, and you can do it easily!
Thanks for reading, also, if you found anything interesting or informative then please share this with your Minecraft Buddies!!
Keep Reading, Keep Learning!
Recommended – Top 5 most realistic texture packs in Minecraft

